15 Best Bomber Jacket Sewing Ideas You Need To Try!
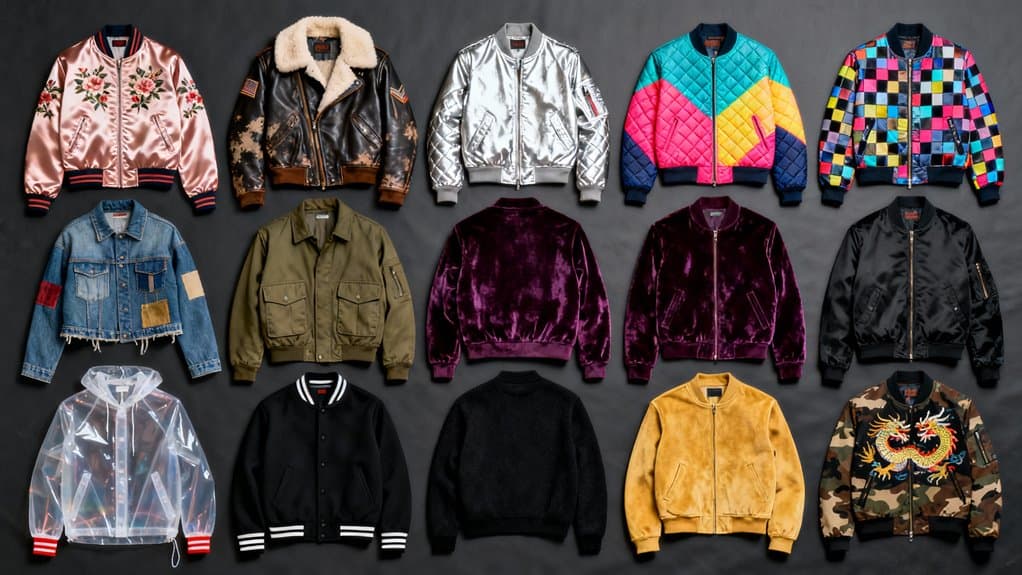
I’ve been sewing bomber jackets for years, and I can tell you they’re one of the most rewarding projects you’ll tackle. Whether you’re drawn to classic nylon with those iconic ribbed trims or want to make a statement with luxe brocade, there’s a style that’ll match your skill level and aesthetic. I’ve gathered fifteen designs that range from beginner-friendly to advanced techniques, and I’m excited to walk you through what makes each one special.
Key Takeaways
- Classic nylon bombers feature water-resistant shells with cotton ribbing, while brocade versions create unique statement pieces requiring intermediate skills.
- Color-blocked designs combine complementary fabrics and custom printed linings to transform basic bombers into personalized conversation pieces.
- Oversized corduroy and faux leather options offer varied textures; pre-wash corduroy and fully line pleather for professional results.
- Quilted bombers with pre-quilted fabrics provide warmth; use bagging method for zippers and stabilize collars with interfacing.
- Customize with embroidered patches, metallic zippers, and gathered sleeves; apply double topstitching on high-stress seams for durability.
Classic Nylon Bomber With Ribbed Trims

When I think of the bomber jacket that started it all, the classic nylon style with ribbed trims immediately comes to mind. This design features a durable 100% nylon outer shell that resists water and wind, while 100% cotton ribbing at the collar, cuffs, and hem creates that signature fitted look. I love how the roomy silhouette through the shoulders tapers at the waist, giving you freedom of movement without bulk. The ribbed trims aren’t just aesthetic—they seal out drafts and help the jacket hold its shape beautifully. When you’re sewing yours, focus on selecting heavyweight nylon and quality ribbing that won’t pill. Install a separating zipper for easy on-and-off, and add practical pockets for everyday functionality. For inspiration, you can find beautiful examples like the Emporio Armani Shiny Nylon bomber jacket that showcase how luxurious this classic style can look when executed with premium materials. Additionally, consider incorporating variation suggestions such as unique linings or pocket styles to personalize your bomber jacket even further.
Brocade Statement Bomber for Bold Everyday Style

The classic nylon bomber holds a special place in fashion history, but brocade fabric transforms this sporty staple into something extraordinary. I love how the sporty bomber cut creates the perfect foil for fancy brocade texture, making it your wardrobe’s MVP with unique statement appeal.
When selecting fabric, remember classic brocades typically come in 73 cm bolt widths, requiring longer yardage than standard fabrics. I recommend choosing set-in sleeves over raglan styles to avoid cutting through those beautiful brocade motifs. For construction, you’ll need intermediate sewing skills to tackle welt pockets, zippers, and linings. Additionally, mastering finishing techniques such as lining and topstitching will elevate your bomber jacket’s overall quality. Plan to add an extra 15% fabric allowance when working with large motifs to ensure proper alignment across your jacket pieces.
Consider patterns like Burda’s September 2014 or May 2021 editions, or Simplicity S8418 specifically designed for brocade bombers. Pair your luxurious fabric with contrasting ribbing for a polished finish.
Oversized Corduroy Bomber With Unlined Construction

If you’re craving comfort without sacrificing style, an oversized corduroy bomber with unlined construction delivers both in one satisfying project. I recommend wide-wale corduroy for enhanced texture and softness that complements the relaxed silhouette beautifully. Pre-wash your fabric to prevent post-construction shrinkage, and remember corduroy is directional—cut all pieces the same way for consistent color. Adding a customization option like pockets or appliqué can elevate your design and provide functional flair.
Without lining, you’ll reduce weight and improve breathability while speeding up assembly. Finish internal seams with bias binding or French seams to prevent fraying. The oversized fit comes from dropped shoulders and added ease, while classic ribbed cuffs, collar, and waistband provide structure. I suggest making these ribbed components slightly shorter than openings to create gentle gathering. Cut your waistband and collar on the fold for a smoother finish that eliminates bulky seams. Press constantly during construction to maintain crisp seams on this textured fabric.
Faux Leather Bomber With Structured Silhouette

Structured faux leather transforms an ordinary bomber into a statement piece that holds its shape beautifully while staying comfortable enough for all-day wear. I recommend selecting medium-weight pleather with flexibility—avoid brittle varieties that’ll crack during construction. Additionally, consider using upcycled materials for a sustainable approach to your sewing project.
Use clips instead of pins to prevent permanent holes, and equip your machine with a leather needle (size 90/14) plus a walking foot for smooth feeding. Sew longer stitches (3–4 mm) to minimize perforation risk.
For that signature bomber silhouette, I incorporate shaped sleeves, defined shoulders, and a tapered waist. Add a double-pull zipper and reinforce welt pockets with interfacing. Line the jacket fully with smooth fabric so it slides on effortlessly. Since faux leather lacks natural warmth, interface the entire jacket to add weight and insulation throughout. Finish with knit ribbing at cuffs and hem—stretch it slightly while sewing for that authentic snug fit.
Quilted Bomber Jacket for Cold Weather Wear

While faux leather brings year-round versatility, quilted bombers deliver serious insulation when temperatures drop. I recommend selecting pre-quilted fabrics in metallic finishes like pink, golden, or blue for stunning cold-weather pieces. The padded construction provides warmth while maintaining structure. Additionally, consider incorporating classic trench elements like storm flaps and belted waists for added style and functionality.
Here’s my approach: I quilt large fabric rectangles before cutting pattern pieces, which simplifies the process considerably. Use a Microtex needle for synthetic materials and apply anti-fraying spray to edges immediately after cutting. Start with a Basic Bomber Jacket Block in size 50 as your foundation template for proper proportions.
I incorporate essential design elements like stand-up collars with flaps, two-piece sleeves with Velcro cuffs, and 6 cm knit waistbands. Add front yokes with flap pockets and back pleats for movement. Line yours with jersey fabric for comfort, and install a 50 cm removable zipper using the bagging method for professional results.
Satin Bomber With Glossy Fashion-Forward Finish

Satin bombers transform the classic silhouette into a statement piece that catches light and turns heads. I love how the smooth, glossy surface instantly elevates this streetwear staple into high-fashion territory, whether you choose jewel tones or bold prints. Adding decorative techniques like appliqué or embroidery can further personalize your bomber.
Working with satin requires patience. I recommend using sharp pins and French seams to manage fraying, while topstitching carefully to avoid puckering on that shiny surface. Pattern matching is essential for printed fabrics—it’s what separates homemade from professional. For challenging areas like sleeves, pin-basting and steam can help adjust ease and ensure a professional fit.
I suggest pairing metal zippers with contrasting matte ribbing for balanced texture. Consider making yours reversible for two looks in one jacket. The delicate fabric does require gentle care, but hand washing and low-heat ironing will keep that luxurious sheen intact for years.
Color-Blocked Bomber With Contrasting Panels

Color blocking gives you the power to create a bomber jacket that’s truly one-of-a-kind. I recommend starting with complementary colors like yellow and ultramarine blue, or trying a triadic scheme with red, blue, and yellow for maximum impact. Choosing the right interfacing can significantly enhance the structure of your bomber jacket.
You’ll need to separate your pattern pieces strategically—divide the center front into sections for gradient effects, and split the back panel into three pieces for an Art Deco-inspired design. Add notches two inches above and below the apex along style lines to guarantee perfect alignment.
During construction, sew darker sections first, then press seams open and top stitch using your presser foot edge as a guide. Turn corners at precise 90-degree angles to maintain clean geometric lines. High-contrast thread creates striking definition along every seam. Consider combining matte with shiny fabrics to add texture variation and visual interest to your color-blocked design.
Embroidered Bomber With Custom Patches

Custom patches transform a plain bomber jacket into a wearable canvas that tells your unique story. I recommend positioning embroidered patches strategically—chest, sleeves, or back—to maximize visual impact. Before attaching, clean your jacket thoroughly and iron it flat to guarantee proper adhesion.
For durability, I prefer sewing patches onto thick bomber fabrics using a thimble for hand-stitching. If you’re short on time, the iron-on method works well; just use medium-high heat with a protective cloth and skip the steam. Fabric glue offers another no-sew option for quick applications. Additionally, consider choosing durable fabrics that will withstand heavy use and keep your patches secure.
I love mixing embroidered and woven patches for texture variety. Consider incorporating initials, symbols, or vibrant metallic threads to create one-of-a-kind designs. Velcro backing lets you swap patches seasonally, keeping your bomber fresh. When ordering custom designs, request free mock-ups to visualize how your patch will look before production.
Metallic Zipper Bomber With Snap Closure Details

While patches let you personalize the surface of your bomber, upgrading the hardware itself creates instant polish. I recommend installing a front metallic zipper in aluminum, nickel, or brass for that sophisticated, trendy look. Exposed zippers in finishes like antique brass or rose gold create dramatic visual impact.
Here’s where it gets interesting: add snap closures at the collar or hem for dual-functionality. I coordinate snap finishes with my zipper—brass snaps with brass zippers—for cohesive detailing. Install snaps using a press-tool for durability.
During construction, I hand-crank my machine near metal teeth to prevent needle breakage. Pin your zipper placket carefully for symmetrical alignment, and reinforce high-stress areas with interfacing. Choose heavier fabrics that support metal hardware beautifully. For sourcing quality metal zippers, check retailers like Zipper Island for various sizes and finishes.
Gathered Sleeve Bomber With Elastic Bands

I’ve discovered that gathered sleeves transform an ordinary bomber into something truly special, creating that coveted designer silhouette you’ll find in high-end boutiques. The technique is surprisingly straightforward—I use flat elastic bands, typically 6mm wide, threaded through sleeve channels.
Start by finishing your sleeve edges with an overlock stitch, then fold and press the hem twice. Leave a small gap in your stitching to create a channel for the elastic. I attach a safety pin to guide it through smoothly.
The magic happens when you gently pull the elastic to distribute the fabric gathering evenly. Secure the ends with zigzag stitches, then close the channel with invisible stitches. This ruching effect works beautifully with velvet or cotton, adding sophisticated texture to your bomber.
Bagged Lining Bomber for Professional Finish

Because nothing elevates a handmade bomber jacket quite like a bagged lining, I consider this technique essential for achieving that store-bought polish. You’ll construct the shell and lining separately, then stitch them right sides together at the neckline, fronts, and hem—leaving an opening in the lining’s side seam. Turn everything right side out through that gap, and you’ve got beautifully enclosed seams with no raw edges showing.
I always choose slippery fabrics like satin or cupro for smooth movement. Remember to cut your lining 5/8″ shorter than the shell and add back pleats for ease. The real secret? Clip corners, grade seam allowances, and press thoroughly at every stage. These small steps transform your bomber from homemade to professionally finished. For added structure at closures, consider adding optional interfacing where you’ll be attaching buttons or other fasteners.
Topstitched Bomber With Reinforced Seams

Double rows of stitching across my bomber jacket’s seams don’t just look sharp—they transform the garment into a workhorse that’ll withstand years of wear. I focus my topstitching efforts on high-stress zones: shoulders, pockets, and waistbands benefit most from this reinforcement technique. Before I stitch, I press all seam allowances open to create that crisp, professional finish you’ll love.
I’ve found medium-weight fabrics like cotton twill hold topstitching beautifully while preventing separation over time. The collar and yoke deserve interface backing before construction—this extra step stabilizes these areas considerably. When attaching stretch waistbands, I use “stitch in the ditch” to anchor them securely. Most seams require 3/8 inch allowances, which provide adequate material for secure topstitching without adding unnecessary bulk.
Industry estimates suggest reinforced seams extend jacket lifespan by 30%, making this technique worth mastering for garments you’ll treasure.
Unisex Oversized Bomber From Burda Pattern

When I first unfolded Burda Pattern 5001, I realized this unisex design offers something rare—a genuinely inclusive silhouette that flatters every body type. The oversized fit creates that coveted relaxed vibe while maintaining structure through carefully placed ribbing at the cuffs and hem.
I love how this pattern accommodates quilted fabrics beautifully, making it perfect for a winter bomber. The contrast panels add visual interest without overwhelming the design. You’ll need intermediate sewing skills, particularly for the zipper installation and pocket construction.
The drawstring hem feature from Burda 4389 pairs well with this style, letting you adjust the fit. I recommend using interfacing generously—it’s essential for maintaining that classic bomber shape. Choose nylon for sportswear or wool blends for sophistication. You can customize the design with fabric choices, various linings, decorative buttons, and functional pockets to express your personal style.
Bomber With Custom Printed Contrast Lining

Since discovering custom printed linings, I’ve transformed ordinary bomber jackets into conversation pieces that reveal their personality only when unzipped. I use sublimation printing for vibrant, durable polyester linings or digital textile printing for detailed cotton designs.
Here’s my construction approach: I cut lining panels about 1″ larger than outer fabric pieces to guarantee comfortable ease inside. I add 1 cm seam allowance around all pattern pieces and carefully follow grainline markings for symmetrical placement.
For assembly, I prefer the bagging-out technique—sewing lining and outer shell right-sides together, then turning inside out for invisible seams. I secure everything along cuffs, neckline, and hems with machine stitching.
The result? Hidden pops of botanical prints, personal photography, or bold geometric patterns that make each jacket uniquely mine.
Twill Bomber With Welt Pockets and Set-In Sleeves

The structured elegance of a twill bomber with set-in sleeves elevates this casual staple into something you’ll reach for on repeat. I recommend starting with lyocell or tencel twill if you’re building confidence with these techniques.
The set-in sleeve construction requires careful template work. I trace my armhole measurements from a well-fitting sweater, adding one-inch seam allowances throughout. A French curve tool helps shape that vital lower armhole curve perfectly.
For welt pockets, I cut four pocket pieces and align them precisely with my front panels before assembly begins. I always apply Fray Check to prevent unraveling during construction.
Standard brocade width measures 73cm, so you’ll need longer yardage. Finish seams with the Hong Kong method using satin bias tape for that professional touch. Consider pick-stitching your zipper instead of machine-stitching for a more elegant and refined finish.
Conclusion
I’m so excited for you to start your bomber jacket journey! Each of these designs offers something special—whether you’re drawn to the luxe feel of brocade, the practicality of quilted warmth, or the edginess of faux leather. I encourage you to trust your instincts, take your time with the construction details, and don’t be afraid to add your own creative twist. Your handmade bomber will be a treasured piece you’ll reach for again and again.

Keep reading
20 Latest Crochet Neck Warmer Ideas To Try In 2025!
Link up with the 20 best crochet neck warmers that blend warmth and style—discover which designs will transform your winter wardrobe!
20 Amazing Crochet Jewelry Ideas
Amazing crochet jewelry ideas await you, featuring unique designs that will inspire your creativity and elevate your accessory game to new heights.
20 Amazing Crochet Kit Ideas
Navigate through 20 amazing crochet kit ideas that spark creativity and joy; discover the perfect project to ignite your crafting passion!
Need personal guidance?
Talk to an advisor
Our care experts are here to help you make the right choice — for free.